UBI iOS SDK 接入指南
安装
需使用cocoapods第三方库管理工具引入
Podfile引入仓库源https://gitee.com/baixingkefu/ubisdkpodspec.git
示例如下:
| platform :ios, '10.0'
source 'https://cdn.cocoapods.org'
source 'https://gitee.com/baixingkefu/ubisdkpodspec.git'
target 'UBITestDemo' do
use_frameworks!
pod 'UbmSDKPod', '0.1.30'
end
|
注意⚠️:
当source 'https://github.com/CocoaPods/Specs.git' 更新不了第三方库的话,可以使用source 'https://cdn.cocoapods.org' 或 source 'https://github.com/aliyun/aliyun-specs.git' 来更新。
编写完成之后执行 pod install命令。
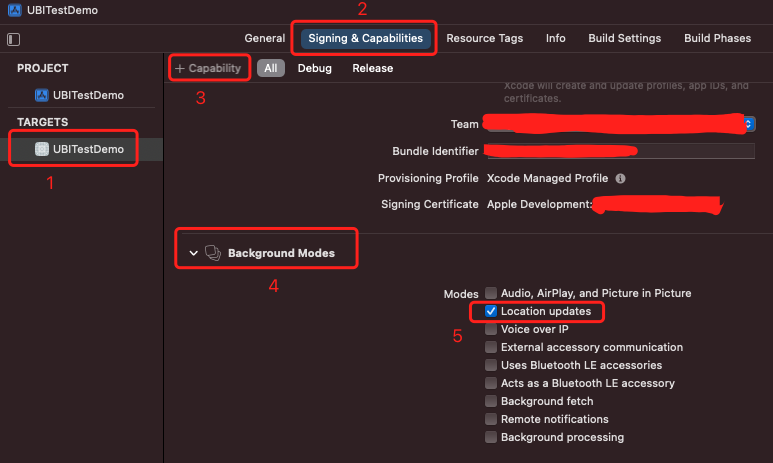
配置
设置xcode,需要勾选必要的后台设置
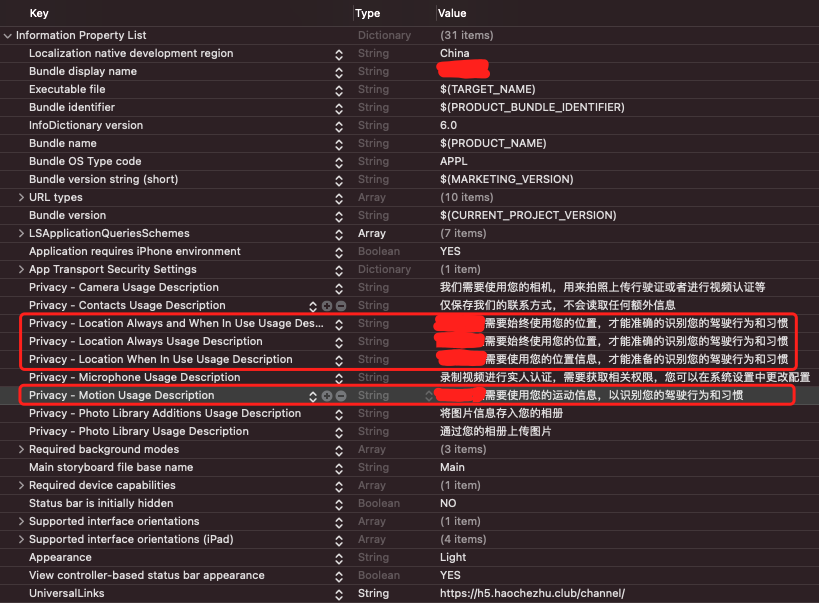
设置工程的info.plist文件,需要有定位,和运动与健身的使用说明
系统版本要求
iOS 10+
API使用
API回调参数说明
| onSuccess:成功回调
onFailue:失败回调
code、msg:详见ErrorCode 说明
|
实例化CredentialProvider
 1
 2
 3
 4
 5
 6
 7
 8
 9
10
11
12
13
14
15
16
17
18
19
20 | // 需要引入SDK头文件
#import <UBM_SDK/UBM_SDK.h>
// 1. 首先需要获取到相应的userId 和 passportToken
// 2. 初始化UBICredentialProvider需要填入passportToken和代理对象,如self
UBICredentialProvider *provider = [[UBICredentialProvider alloc] initWithPassportToken:passportToken delegate:self];
// 3. 实现Provider协议方法来刷新token
@interface OneClass () <UBICredentialProviderDelegate>
@end
// 此处为用户需要实现的代理方法
- (NSString * _Nullable)UBICredentialRefreshPassportToken {
// 网络请求刷新Token 需要同步获取token,予以返回
// 此处省略 ........
return aNewPassportToken;
}
|
启动SDK
| [[UBITracking.shared enableSDK:[NSString stringWithFormat:@"%ld", userId] provider:provider] onSuccess:^{
//初始化SDK成功
} onFailure:^(NSInteger code, NSString * _Nonnull msg) {
//初始化SDK失败
}];
|
关闭SDK
| [UBITracking.shared disableSDKOnSuccess:^{
//关闭行程成功
} onFailure:^(NSInteger code, NSString * _Nonnull msg) {
//关闭行程失败
}];
|
手动开始行程
| [UBITracking.shared startTripOnSuccess:^{
//手动开始行程成功
} onFailure:^(NSInteger code, NSString * _Nonnull msg) {
//手动开始行程失败
}];
|
快速开始行程
对startTrip接口(手动开始行程)的封装
功能:
1.检查SDK的初始化情况,未初始化回调错误。
2.检查相关设备权限,满足条件则开启行程并回调成功结果。
3.权限不满足则会弹出权限询问框,同时回调错误。
| [UBITracking.shared quickStartTripOnSuccess:^{
} onFailure:^(NSInteger code, NSString * _Nonnull msg) {
}];
|
手动结束行程
| [UBITracking.shared stopTripOnSuccess:^{
//手动关闭行程成功
} onFailure:^(NSInteger code, NSString * _Nonnull msg) {
//手动关闭行程失败
}];
|
开启自动监测
| [[UBITracking shared] startAutoRecordOnSuccess:^{
//开启自动监测成功
} onFailure:^(NSInteger code, NSString * _Nonnull msg) {
//开启自动监测失败
}];
|
快速开启自动监测
对startAutoRecord接口(开启自动监测)的封装
功能:
1.检查SDK的初始化情况,未初始化回调错误。
2.检查相关设备权限,满足条件则开启行程并回调成功结果。
3.权限不满足则会弹出权限询问框,同时回调错误。
| [[UBITracking shared] quickStartAutoRecordOnSuccess:^{
//快速开启自动监测成功
} onFailure:^(NSInteger code, NSString * _Nonnull msg) {
//快速开启自动监测失败
}];
|
关闭自动监测
| [[UBITracking shared] stopAutoRecordOnSuccess:^{
//关闭自动监测成功
} onFailure:^(NSInteger code, NSString * _Nonnull msg) {
//关闭自动监测失败
}];
|
权限设置
需要初始化 UBMAuthSettingController,并展示控制器,之后点击Button设置权限,包括定位权限和运动与健身权限
| UBMAuthSettingController *vc = [[UBMAuthSettingController alloc] init];
[self.navigationController pushViewController:vc animated:YES];
|
权限引导
用UBMAuthGuideController类方法直接跳转,之后点击Button设置权限,有下列两种方式:
| [UBMAuthGuideController jumpToAuthGuideWebViewByNavigation:self.navigationController];
|
| UBMAuthGuideController *guideVc = [[UBMAuthGuideController alloc] init];
UINavigationController *nav = [[UINavigationController alloc] initWithRootViewController:guideVc];
guideVc.modalPresentationStyle = UIModalPresentationFullScreen;
[UIApplication sharedApplication].keyWindow.rootViewController presentViewController:nav animated:false completion:nil];
|
历史行程
需要初始化 UBMRouteHistoryController,并展示控制器
| UBMRouteHistoryController *vc = [[UBMRouteHistoryController alloc] init];
vc.hidesBottomBarWhenPushed = YES;
[self.navigationController pushViewController:vc animated:YES];
|
判断当前是否有正在记录的行程
| // 返回BOOL,返回YES表示正在行程中,返回NO则相反
[[UBITracking shared] isTripOnGoing];
|
自动记录是否正在工作
| // 返回BOOL,返回YES表示正在工作中,返回NO则相反
[[UBITracking shared] isAutoOn];
|
ErrorCode 说明
| 值 |
说明 |
| 0 |
成功 |
| 1 |
未知错误 |
| 1000 |
调用参数错误 |
| 2000 |
SDK未初始化 |
| 3000 |
没有获取所需权限 |
| 4001 |
上传文件失败 |
| 4002 |
没有运行中的行程 |
| 4003 |
调用操作不是在主进程进行 |